
I mentioned earlier this week my obsession lately with Disney themed crafts for my upcoming trip to Disneyland to enjoy their fall festivities for the first time and share in the 60th Diamond Celebration fun. Since my travel partners are two of my best friends, Rachel & Lorenza, and no children, I’ve been looking for some crafts that don’t involve countdowns, reveals, or stuff that’s obviously for kids. We had discussions on what kinds of things we’d need for the trip and what kinds of things we wanted to embellish ourselves. One of the things we decided we wanted to make unique were water bottles.
 After much reading of various articles on how to ensure a successful Disneyland trip, we learned a few key things that would help with our water bottle decisions.
- Weather is slightly unpredictable and could be warm, even in mid-October.
- You’ll be doing more walking than you want to (duh).
- All restaurants in Disneyland and Disney’s California Adventure offer free cups of ice water.
One of the articles specifically recommended a specific style of water bottle that screws open in two places – the standard narrow drinking portion, and then a wider opening slightly further down that would allow you to dump in those cups of ice water. Perfect – easy to fill with ice & pour water around as needed. Thankfully, we started planning this trip many months in advance, when Walmart had their biggest selection of water bottles available. So I went ahead and picked up 3 Aladdin 32 oz. Sparkling Water Vessel with Infuse Baskets (appropriate brand name, eh?). They are big enough to minimize stops hopefully, and the added bonus of the infuse baskets means that we can use them or not, they come out. And Rachel has “Spa water” recipes ready to pitch us 🙂
I purchased the Mouse Flourish and Mouse Uppercase Alphabet SVG files from Miss Kate Cuttables and found a font online that was designed to mimic Disneyland’s iconic sign. I played around with the font for a bit, and really didn’t like it. Since these are not at all intended for sale, and are for our own personal use, I went ahead and found a clean version of the Disneyland logo to use instead. We decided on red for the flourishes, black for the initials (the only unique feature of each bottle), and an appropriate blue for the Disneyland logo.
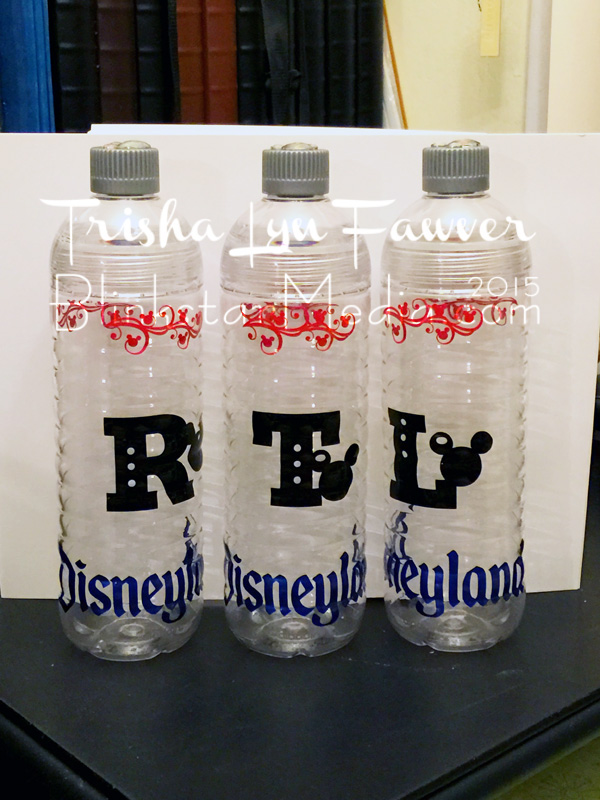 Finding just the right blue to match Disneyland’s Diamond Celebration in honor of their 60th anniversary was tricky. Originally I was going to order a glitter vinyl from Happy Crafters, but I decided glitter might be too childish. Not sophisticated enough for a Diamond Celebration. I remembered that Expressions Vinyl had metalized vinyl, but soon found it was all silver, gold, or carbon fiber – no blue. I did some more digging around, searching for the specific brand/model name Oracal 651 and found CraftVinyl.com. Some folks in a Facebook group I’m in for Cricut users have had mixed results both with customer service and inventory issues with this site, and being someone in the online retail business I found it to be CRAZY outdated visually, but I decided that since they had the blues I was looking for, glossy, sparkly without being glitter, and most importantly, Oracal 651 (i.e. permanent), I took the risk and ordered two blues that looked close. I am happy to report that I had no issues (as long as you read all the warnings on the site, you’re fine) and will likely order from there again.
Lorenza helped me decide on which blue matched better, and I made the cuts from it, red, and black Oracal 651 that I already had on hand. I set to the task of applying them all and let me tell you – dealing with both the curves around a bottle AND the ridges on the bottle was a BITCH! They are not perfect – there were some bubbles I had to use a needle prick to try to flatten. The easiest were the flourishes since they were on the only flat part of the bottle. Unfortunately since its meant to be layered, the Minnie flourish didn’t cut cleanly at such a small size, so instead of the initial design of alternating Minnie flourish & Mickey flourish going around, just two oppositely placed Mickey flourishes are the result. Not perfect, but they’re ours, dang it! Our own unique souvenirs.
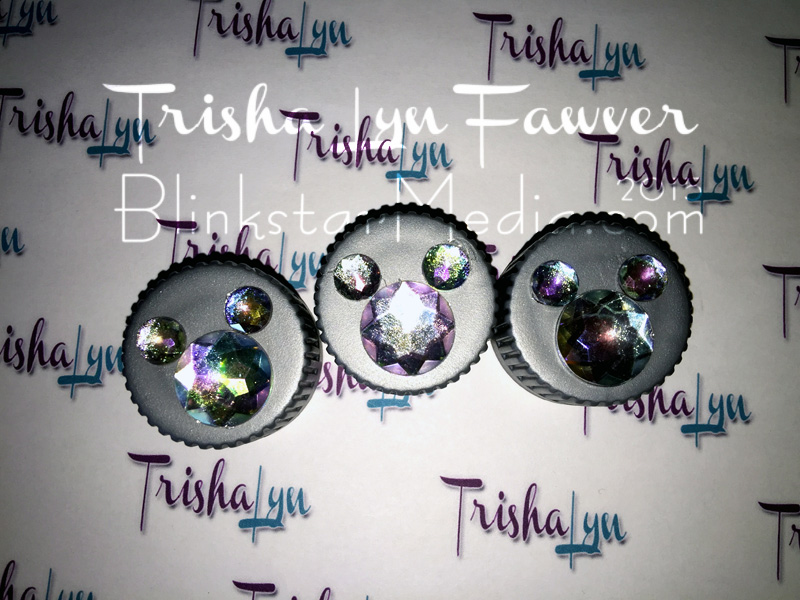 As an added bit of bling, I wanted to do something on the caps. I decided that it would be a secret (until Rachel & Lorenza came over last weekend & I revealed it to them). So I took my first stab at using E6000 adhesive and some gemstones. I bought an assortment of sizes and played with different sizes and placements until I was happy with the result, and glued them down. An added nod to the Diamond Celebration!
So there you have it! After we actually GO to Disneyland in a few days, I’ll know how well the vinyl held up and all. Fingers crossed for me!
What kind of crazy crafts have you done for a trip?
One Comment
Join the conversation and post a comment.
Trackbacks/Pingbacks
- 2 Days until Disneyland! - TrishaLyn.com - […] already posted about our DIY Disneyland Water Bottles that I made, and I embellished some little tubular containers to hold…
Sponsors
Love these! And the Mickey on the bottle cap is an awesome touch!