

Halloween manicure time! After having taken quite the break from doing my nails, I jumped in full force this month with three different Halloween themed manicures. They range from basic to somewhat advanced, but all are spooky fun!
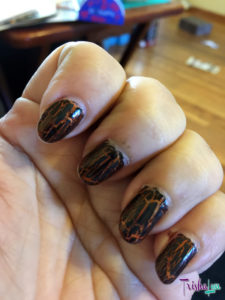 I started off at the beginning of the month with a very basic manicure as a test of my August 2016 Julep Maven box. I used Julep Pam, described as a tigerlily holographic polish, as the base. I have to say, I was a bit disappointed in Pam. I didn’t see any holographic properties and it seemed just like an orange glitter. When I think holographic, I really think of colors like Color Club Holo Hues Cosmic Fate. That’s another manicure for another day, though. So I decided to add my generic black crackle polish over it for my first Halloween manicure.
The nice thing about crackle polish is that it covers all ills. Since it’s meant to crack and show the color below, it’s a fast manicure to give you a unique look. Also, it’s a great way to save a messy manicure no matter what the color underneath is. Not that this Halloween manicure needed saving, but it was just an orange manicure before I added the black crackle to make it into a Halloween manicure!
Next, I splurged and got a professional manicure at a local salon. Even though I do my own manicures 98% of the time, it’s nice to be pampered every once in awhile and have a pro clean up my cuticles and shape my nails. Shaping is one of the things I’m still not as good at as I’d like to be. I made sure to decide on what I’d do to the basic salon manicure before going so I knew what color to get. I decided on a pale white OPI polish with a tiny bit of shimmer; I wish I’d made a note of what the color name was!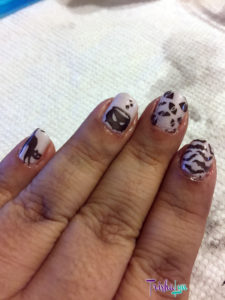
Once I got home, I broke out the Bundle Monster Holiday Collection stamping plates and Sinful Colors Black on Black to transform a basic white manicure into another Halloween manicure. I used plate BM-H08 to add some variation with the spooky eyes, bats, tombstones, cats, and cauldron to my nails. Since I’d gone for the manicure with Lorenza and we were hanging out while I was adding the stamping, she was fascinated with the process and what I was doing! It definitely made me a little nervous to get the stamping right since I’ve had mixed results with stamping in the past. However using the clear jelly stamper I got back in January really helped and the results look great!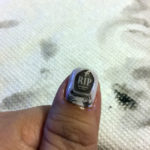
Lastly, I picked a Halloween manicure that would last the final stretch until November. I’ve been hording a bunch of nail wraps for awhile looking for the perfect time to use them and decided that I need to just use them up before buying more! So I dug out my Sally Hansen Salon Effects Real Nail Polish Strips with the Spun for You spider web design. These were a bit more challenging to work with than some of the other designs I’ve used due to the metallic opacity. The more opaque designs stretch a bit better and maintain their opacity. The metallic designs start to get a bit more transparent with you stretch it too much, so I had to be more careful trying to get full coverage on these.
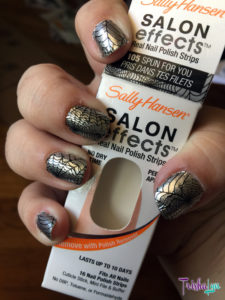 The nice thing about the Sally Hansen strips is their wear durability. As the package says, they do last up to 10 days. With Halloween being on a Monday I wanted these to last at least a week so they’d look nice on for more than the week my other manicures usually last. Not that I have any Halloween plans this year beyond just having friends over and passing out candy, but at 35 our Halloween plans have really slowed down in the last few years.
I hope this gave you some good ideas to dress up your nails for tonight’s Halloween festivities. Try to ignore it’s still Monday 🙂
Sponsors